please forgive the long introduction, but i have to tell a little “how we met” story about today’s guest, gail from probably actually. in my pre-blog flickr days, i noticed a gal posting one lovely creation after another under the handle “supergail” (which made me like her right off the bat). we were both active in the oliver + s flickr group and it turned out that we often commented on each other’s creations. one day, she mentioned fabric depot in a description and i realized that she lived in portland too! we started emailing back and forth, then after a bit of that i asked if she might want to hang out sometime? i was so nervous to ask, but she agreed! we met up at a park (you know, just in case she was a serial killer) with the kids last summer, and we’ve been real life friends ever since. our first meeting was really fun, comparing blogs that we read, sewing books, projects, life. i’m trying not to be overdramatic here, but it was a dream come true for someone to just KNOW what i was talking about! i’m so lucky to have a local friend as nerdy about sewing as i am. 🙂
so anyway, gail started her blog almost a year ago and she is awesome. she sews for her adorable little gal lila, she dabbles in sewing for herself, and she makes the greatest mini projects (tea bags, felt pasta, doll swaddlers, etc.). her style is peaceful, her use of color is incredible, and her sewing is pristine (especially in person!). oh yeah, she’s also really funny.
i’m excited to have gail here today with a beeeyoooootiful remixed oliver + s dress that takes two of their classically-inspired patterns and makes it feel even more vintage!

Hello fine readers! I’m so pleased and honored to be at Skirt as Top today, celebrating Vintage May along with all these lovely guest bloggers! If you’ve ever visited my blog, you know that I have a bit of a love affair with Oliver + S patterns. In case you’re not familiar with Oliver + S, there are several reasons why they’re among my favorite patterns. First of all, each one is like a mini sewing lesson, full of tips and tricks for future use. The styles are always clean and classic, the fit is spot-on, the directions never let you down, and even the packaging is adorable (and vintage-looking!).

Have I sold you yet? Anyway, I think I’ve tried eleven of them so far, and have used many of those eleven over and over again. So when Kristin asked me to be a part of Vintage May, I immediately began brainstorming my Oliver + S options. Several of the patterns have a vintage or retro look to them, and I ended up combining two of my favorites into one dress, adding a few vintage elements along the way.

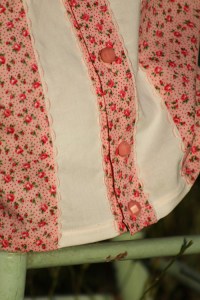
My starting point was the out of print Playdate Dress (EDIT: now available as a digital pattern!) – there’s something about that yoke that gives it a definite retro feel.

And I borrowed the cuffed sleeves from the Puppet Show Dress (also out of print, but also available to download as a pdf), which is another great vintage-looking pattern.

The fabric reminds me a bit of a vintage sheet, or a William Morris floral, or a Liberty print (and is probably as close to a real Liberty as I’m ever going to get!). It’s a soft and breezy cotton lawn called Spring, from Robert Kaufman’s London Calling 2 collection. And the colors definitely evoke spring! This is Vintage May after all, not Vintage November…

There’s pink and white mini gingham in the side-seam pockets and in the hem facing. I love a pattern that allows for hidden surprises like that.


And to throw a little more vintage into the mix, I added mini pompom trim under the yoke. Because pompoms make things look vintage, right?

Now this was a bit trickier than adding the flat piping that the pattern calls for, since the pompom trim has barely any seam allowance. So I’ll attempt to show you how I did it.

First, I sewed a line of basting stitches 1/2 inch from the raw edge of the neckline, which gave me a line to follow when I placed the trim. Then I matched the trim (where the poms meet the wee bit of seam allowance) to that line, pinned, and basted it in place along the line using my zipper foot – that way you’re not sewing over the poms. There should be 1/2 inch between the raw edge of the neckline and your line of basting stitches that attach the trim.

That second basting line becomes the guideline for placing your yoke. Do you think I used enough pins? The tricky part was stitching the yoke in place AND catching the pompom trim underneath – I had to sew very close to the edge of the yoke in order to catch it. The zipper foot comes in handy here, too.

In retrospect, it might make sense to actually sew the trim to the neckline rather than just basting. That way, even if you miss a spot as you’re top stitching the yoke in place, the trim is securely anchored under there. Or better yet, maybe there’s pompom trim available out there with a more generous seam allowance?


Thanks so much for having me, Kristin! I’m looking forward to the rest of Vintage May, week two!
***
thank you so much, gail! i gotta get me some of that amazing fabric! today jess has katy dill showing you how to make a fascinator. don’t know what a fascinator is? go see!