fairy tale christmas dress

oh hey!  how’s it going?  did you have a nice holiday?  right around the time of my last post, our entire family got sick over the course of a week, with two different and nasty little viruses…and then it was nearly Christmas!  i decided it was as good a time as any to take a little blog break.  i did sew a few things, though, so hopefully i can get myself back into the blogging groove.

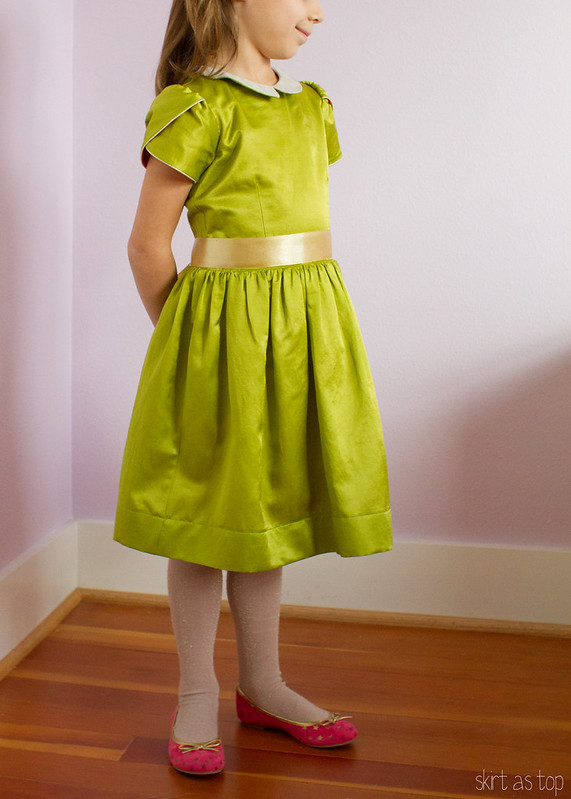
once we were healthy, suddenly E’s school program was only a few days away and she needed a dress!  i tried to talk her into a nontraditional Christmas dress using fabric from my stash, but she sweetly insisted on a fancy green dress with a gold sash, so i hit Fabric Depot right before they closed one night to grab everything i needed.

fairy tale christmas dress

given the fact that that happened on a Monday and the program was on Thursday, i really should’ve kept it simple.  i thought about the Hanami but no, in the end, i had to go all out and sew my first Oliver + S Fairy Tale Dress, which Liesl calls “the ultimate special occasion dress.”   Continue reading

after-christmas cookie recipe

i hope you all had a very Merry Christmas!  once the mad-dash to finish up all of my sewing was done, it was very relaxing and nice.

i don’t know about you, but in the weeks leading up to Christmas, my kids just kept coming home with candy canes.  from classmates, from school, from friends, from greeters at grocery stores, in stockings – candy canes are everywhere around the holidays.

dark chocolate candy cane cookie recipe

one evening, i decided to modify a basic cookie recipe to use a few of those up!  this is the perfect cookie to bake AFTER Christmas, when everyone is still snuggled around and relaxing, and to use something that may otherwise linger around the house for months.  i used dark chocolate baking powder because there’s nothing much better than dark chocolate and mint together if you ask me.  the cookies stayed soft and puffy and have a subtle minty flavor that isn’t overpowering – they taste unbelievably good paired with your morning latte!
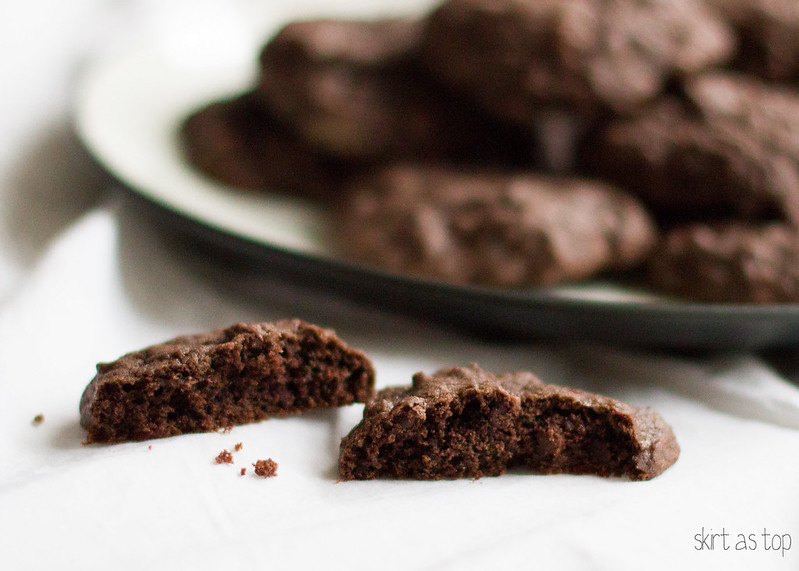
dark chocolate candy cane cookie recipe

i’ve never posted a recipe here before, and frankly it makes me a bit nervous, but my friend and baker-extraordinnaire Jess volunteered as official recipe tester and she gave it a thumbs up, so here we go…

dark chocolate candy cane cookie recipe

: : :  > >  ::  < <  : : :

AFTER-CHRISTMAS COOKIE RECIPE

by skirt as top

yield: about 3 dozen cookies

2 1/4 cups all-purpose flour
1/4 cup unsweetened dark chocolate cocoa powder (I used Hershey’s Special Dark – regular cocoa powder works too)
1 teaspoon baking soda
1 teaspoon salt
1 cup (2 sticks) unsalted butter, softened
1 1/2 cups granulated sugar
2 tablespoons brown sugar
1 teaspoon vanilla extract
2 large eggs, room temp
1 cup semi-sweet mini chocolate chips
2-3 large peppermint candy canes or 4-6 mini candy canes (use more or less depending on how much minty flavor you like)

Preheat oven to 375 degrees.

Unwrap candy canes and put into a plastic ziploc bag, removing as much air as possible and sealing tightly.  Sandwich the bag between two towels and smash candy canes with a hammer into small chips/dust.  If you want, you could also put them in a blender/food processor to pulverize.  Set aside.

In a small bowl, whisk together flour, baking soda, salt, and cocoa powder until well combined.  Set aside.

Beat butter, sugar, brown sugar, and vanilla extract in stand mixer, first on medium speed until combined (1-2 minutes), then increase speed to high and beat for 5-6 minutes, until the mixture gets lighter in color and almost whipped-looking in consistency.

Scrape down bowl, decrease speed to medium-low, and add eggs one at a time, beating well after each addition. Then add flour mixture gradually and beat until just combined.  Do not overmix!

Stir in mini-chips and candy cane pieces by hand. Drop by spoon onto ungreased baking sheets.

Bake for 9 to 11 minutes. Cool on baking sheets for 2 minutes, then remove to wire racks to cool completely.  Cookies should be puffy and soft when you remove them from the oven and (fingers crossed) remain that way after cooling.

ENJOY!!

dark chocolate candy cane cookie recipe

if you make some, please let me know how they turn out!  🙂

this post contains an Amazon affiliate link.
last minute tutorial roundup

hello!  just popping in for any of you cramming a little extra sewing in before Christmas…i realized i’ve published a few tutorials that might help quickly knock a few gifts off your list!  you know, like in case you maybe thought you’d make some amazing quilt or handmade dress or something but now you need to readjust your sewing time requirements for simpler projects because this Christmas season is way shorter than normal…?

all of these are super quick projects, probably an hour each, maybe even less.

: :

: :  > >  FOLDOVER CLUTCH TUTORIAL  < <  : :

a fun sew and easily customizable gift for moms, sisters, friends, teachers, etc.  can be made in my original doily version…

foldover doily clutch

or follow Cherie’s awesome supplemental tutorial to add a color blocked panel to show off a cool print!  great project for fat quarters and scraps.

foldover clutch // skirt as top

: :

: :  > >  PLEATED BUNDT PILLOW TUTORIAL  < <  : :

the pleats look more complicated than they really are, and the envelope closure makes this one a quickie.  make in any fabric with some cool texture, stuff with a cheap down insert (try IKEA, i think they’re $7), and you’ve got a pretty gift for anyone who loves decorative pillows (and who doesn’t, really?).

pleated pillow tutorial

: :

: :  > >  SUPERHERO CAPE TUTORIAL  < <  : :

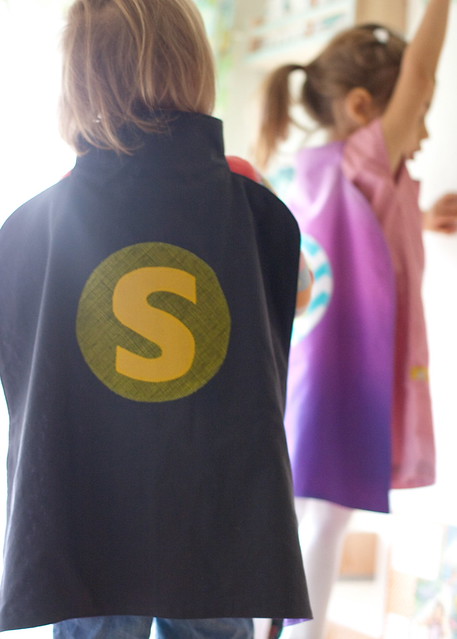
for that super kid  in your life!  totally unisex and customizable depending on your fabric selection, and sized for ages 2 – 6 or so  (Em still wears hers at age 5.5!).

superhero cape tutorial

: :

: :  > >  APPLIQUE BIB PATTERN AND TEMPLATES  < <  : :

got a baby/toddler around?  pair a quick scrap-busting appliqué bib with something store-bought for an easy handmade touch.  tutorial includes a free bib pattern and templates for a mustache, fox, whale, and paper airplane.  you can also throw the appliqués onto store-bought onesies or shirts if that floats your boat!

applique boy bib tutorial

okay, now GO GO GO!  SEW SEW SEW!

i’ll be back after the holidays with the gifts i made – current count is 7 and i’m not quite done yet!  have a very Merry Christmas!

seasons greetings, happy holidays, and…

merry christmas

i hope you and your family have a peaceful and joyous Christmas!  we’re eagerly awaiting Santa’s visit and looking forward to lots of family party time.  Em is hoping Santa brings a pink bicycle and an elephant (shock of shocks), and O is hoping for a helicopter.  probably won’t get a white Christmas around here, but it’s not raining so that’s a plus.

up there is my favorite ornament – i got it when i was just a year old according to the date on the bottom (my mom was great about labeling our ornaments as kids).  it enjoys a place of prominence on the tree each year.  why a sparkly ice cream cone?  no idea, but it makes me smile every time.

take care, and Merry Christmas!!

granny square christmas pillow

continuing on my current quilting kick, i made a pillow for my husband’s company holiday party. they do a Christmas decor gift exchange/yankee swap type thing every year, and this year i decided to add to my quilt block repertoire and make a pillow!

granny square christmas pillow

granny squares are the hot new-old quilt block, did you know? first Jessica made one for me as a pillow for my birthday (which i posted here), then Jess posted her progress on her middle daughter’s new big girl quilt and linked to a great tutorial on how to make them. that did it, it became a “must make.” i figured a pillow would be great practice and the fabric would be fun to figure out. i cut my squares at 3.5″ each and i added a 3″ sashing around the edge to frame the pillow (3.5″ sashing would’ve been better though – bit of a squeeze). the pillow is around 18″ x 18″ finished.

i didn’t pay as close of attention to the tutorial as i should’ve and did a little extra piecing, and i also cut myself with my freshly changed rotary cutter blade during the process, but it still came together in just a few hours and was a fun design to make.

granny square christmas pillow

i did sort of a mix of traditional and more modern prints in Christmasy colors of red and green, with lots of polka dots. the inner square is from a fat quarter of lizzy house leaves and berries in cocoa that i got at bolt a while back (here’s some on etsy!), surrounded by pearl bracelet also from hello pilgrim and two different versions of moda essential dots (i first used the red ones on the amelie dress, and the cream ones i think i got on clearance at fabric depot).

granny square christmas pillow

it’s always hard to show quilting on light fabric. i outlined the squares on the outside edge of each, then ran a second line of stitching echoing the outline around the outside of the block. it created some cool diamond and triangle shapes.

granny square christmas pillow

the back is just an envelope closure with a button to make sure it stays put.

granny square christmas pillow

it’s a bit risky to bring a handmade to an anonymous gift swap; there was stealing allowed and part of me was hoping it’d get stolen a couple times to show the time spent (and blood spilled) was worth it!*

my husband works at a family business though, and my sister in law hid the pillow under the table to prevent it getting stolen! i figure that’s just as good, right? she wanted it to come home with her, and she made sure that happened. so i know it went to a loving home. 😉

granny square christmas pillow

just when it ‘s time to take photos of inanimate objects (which should be a snap), the 2 year old can’t resist playing with the ornaments and photobombing my photoshoot. silly boy.

granny square christmas pillow

what are you making this holiday season? anyone giving any quilted pillows? they’re a fun way to practice your quilting without a huge time commitment! just one block, some quilting, and you’re done. totally fun (unless you slice your fingers – be sure to roll the cutter AWAY from you! AWAY NOT TOWARDS!! sewing is dangerous!).

be safe out there, you guys.

*I promise I did not bleed on the pillow!