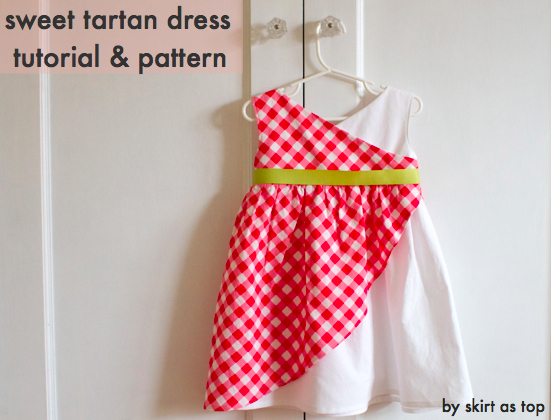
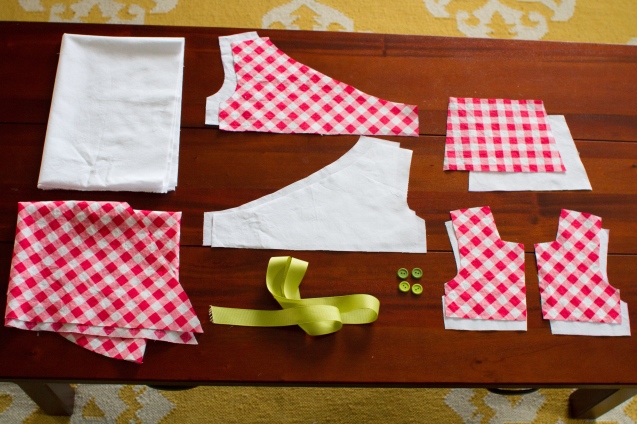
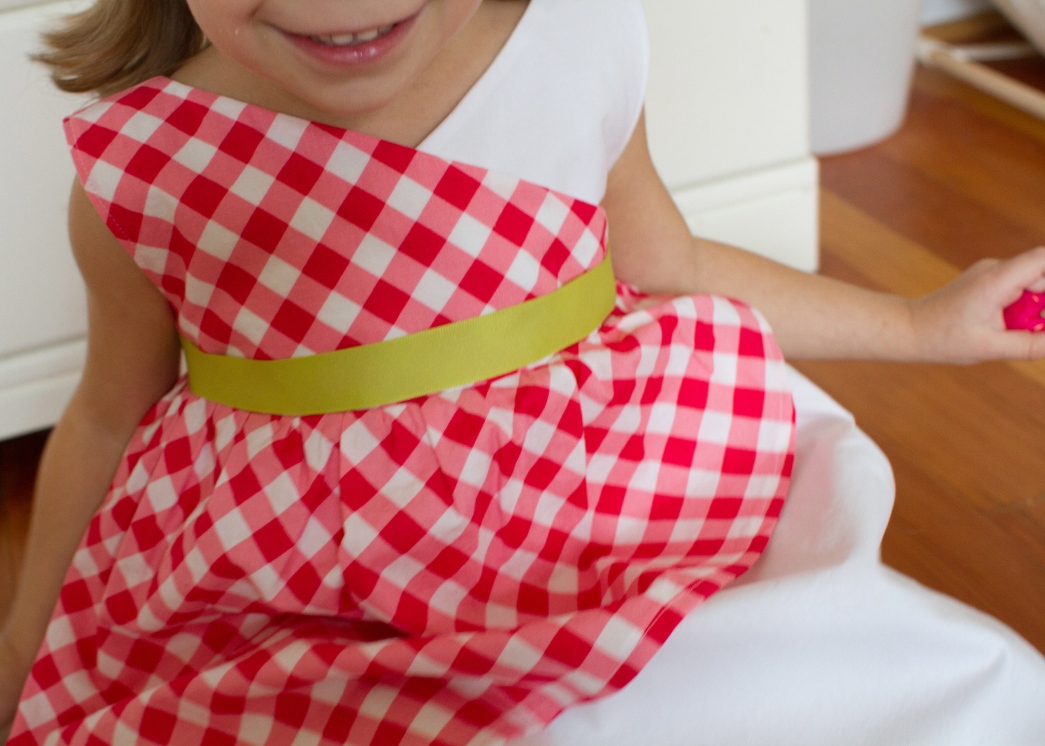
as promised, here is the tutorial for my sweet tartan dress from the first week of project run & play! i made the original in a woven plaid, but didn’t take any photos along the way. so i remade it this time in a pink gingham with green sash, since my daughter is currently obsessed with strawberries and this reminded me of strawberry shortcake dolls i used to play with!
if you’ll remember, the challenge was to remix the adorable junebug dress by jess of craftiness is not optional. i honored my scottish heritage by choosing a tartan and made a dress inspired by alexander mcqueen (more on that here). i flipped the buttoned bodice to the back, drafted a wrap front bodice, omitted the sleeves, and added the gathered overskirt. the whole dress is lined, so i’ll also show you how to make a lined bodice. and i got permisson from jess from CINO to offer my 2/3T pattern pieces as a free downloadable file for you – thank you jess! if you’re drafting your own pattern in a different size, follow her instructions here, and then come back to learn how to adapt it. otherwise, i’ve done a lot of the pattern work for you!
okay, let’s get on with the tutorial.
download the sweet tartan dress pattern
materials:
- 1.25 yd outer fabric (it doesn’t have to be plaid, any fun print will do) – if cutting on the bias, better get 1.75 yds or more to be safe
- 1.5 yd lining fabric
- 4 buttons
- 20″ length of ribbon for optional attached sash
adapting the pattern (if you aren’t using the download provided):
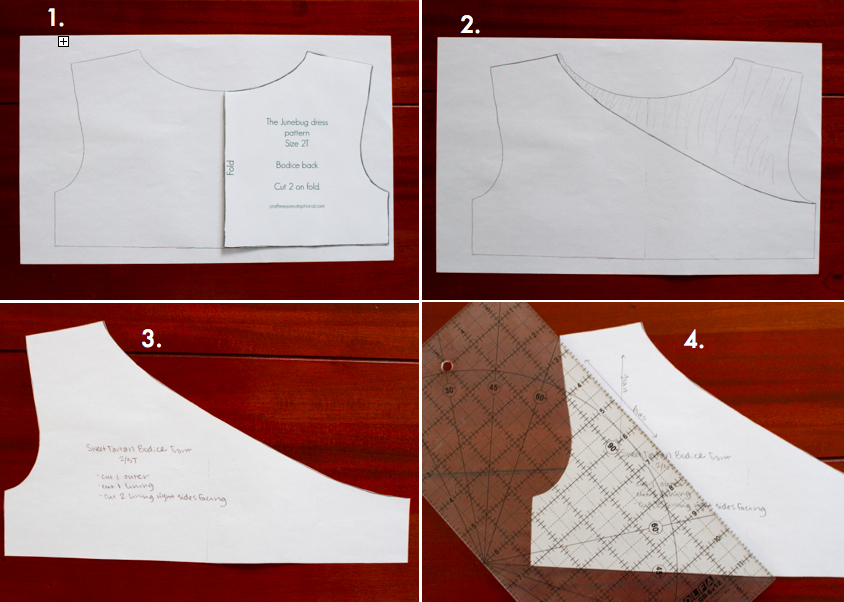
first, take the bodice flap and square off the top so it’s a true trapezoid shape. create the side bodice pieces as instructed by CINO, i didn’t change those at all. then take the back bodice piece and create the wrap pattern as shown:
1. trace and then reflect the back bodice pattern. trace around the other side so you have a full-sized back bodice piece (pattern instructs you to cut on fold but we need the full piece).
2. draw a gentle curve from one shoulder to the opposite armpit.
3. cut out the piece, label it (cut 1 outer, cut 1 lining, cut 2 lining right sides facing).
4. add grain lines if desired (helpful if you want the tartan on the bias).
now you have your front bodice pattern!
cut overskirt and underskirt pieces:
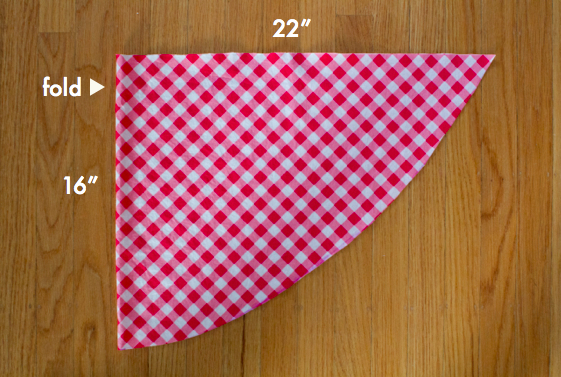
for the overskirt, fold the main fabric selvedge to selvedge (if on the bias, fold on the bias). measure 16″ down from the edge (or however long you want the skirt to be from an empire waist plus about 1/2″ for hem) and mark it on the folded edge. cut the top perpendicular to the fold about 22″ from the fold (44″ total). draw a curve from the mark to the outer edge (either to the selvage if on the grain or about 22″ from the fold if on the bias) with water-soluble pen. cut.
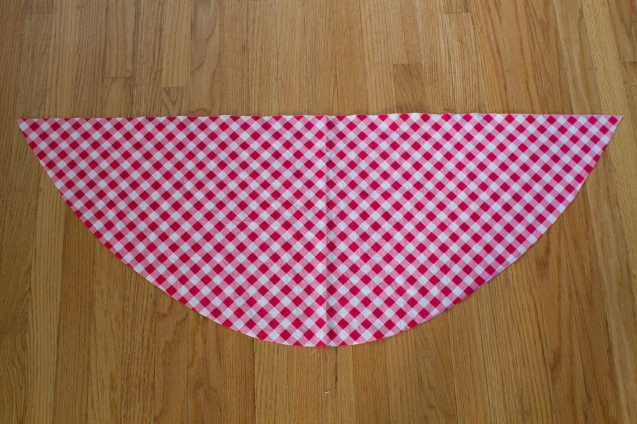
this is what it looks like unfolded. the shape is pretty forgiving, because it’ll be gathered at the top.
then cut your underskirt, 16″ length again, selvedge to selvedge.
cut out the remaining pieces as instructed on the pattern. i cut my outer front bodice, back bodice, and overlay pieces on the bias, and the back flap piece on the grain.
start sewing:
*seam allowance is 1/2″ unless otherwise specified*
first assemble the flap. sew outer and lining right sides together along the sides and top, leaving bottom open. clip corners, turn, and topstitch along the sides and top.
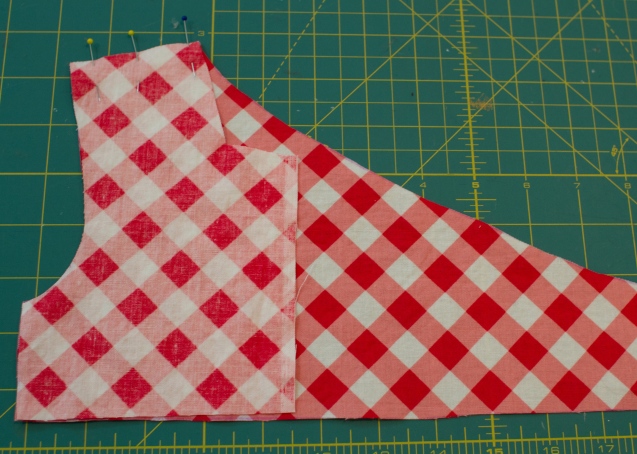
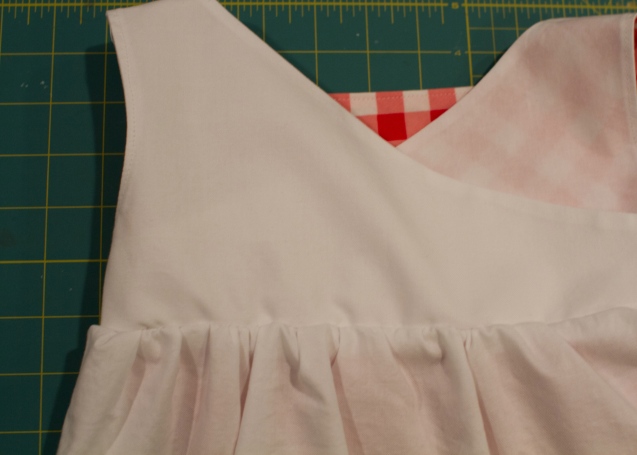
matching armholes right sides together, sew front bodice pieces to their corresponding back bodice pieces at the shoulder seams (outer front to outer back bodice, lining front to lining back bodice, etc.).

press seams open. you should have four pieces that look like the one above (one will be all print, this is half and half, and then two that are all lining).
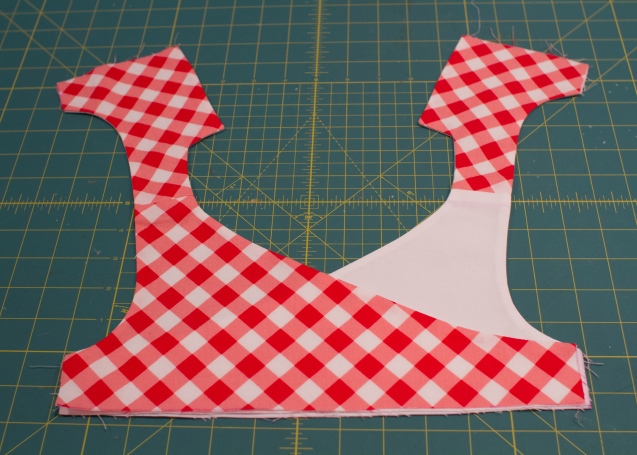
align one side’s outer piece with its corresponding lining piece, right sides together. pin along front curve, back edge, and armhole. do not sew the underarm side seams or bottom seam. repeat for other side.
clip into the seam allowance along the curved front and armholes. clip corners and into the corner of the back bodice piece.
turn each piece rightside out through the open bottom hem (carefully guiding the piece through each shoulder seam), push out corners with a point turner, and press.
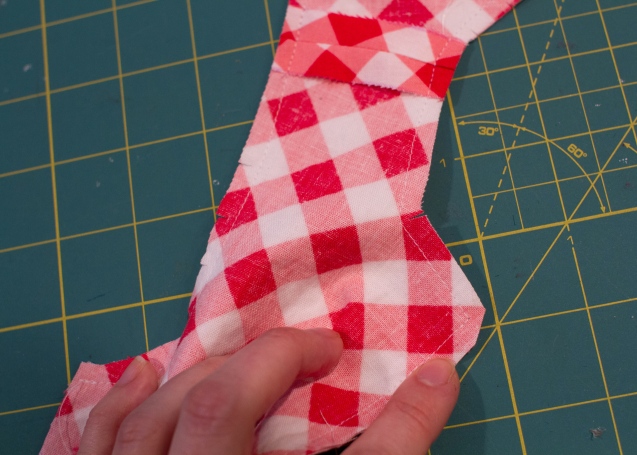
okay, here’s the tricky part to explain…finishing the side seams on the lined bodice. line up the bodice as it will look when it’s finished. separate the underarm sides as shown on the left above, and line up the underlapping side of the wrap with the lining side of the front bodice. then pin the lining to the lining of the back bodice, with the underlapping part of the wrap sandwiched in between. then pin the outer fabric side to the outer fabric of the back bodice (see pinned area in the right photo above). be sure your existing hems are aligned with each other. sew along the edge with 1/2″ seam.
EDIT: this is a good place to try the bodice on your child to check fit – if you like, you can baste the side seams, baste the back bodice flap on (see below) then have her try it on. if the neckline is gaping, unpick and trim the front bodice sides, then sew the front and back together as shown above.
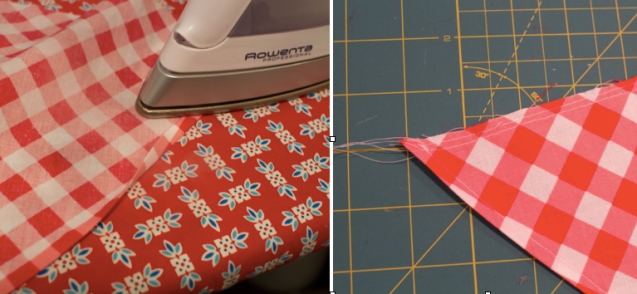
press open, clip to 1/4″ to reduce bulk.
turn rightside out, press side seam flat. you may now topstitch around the armhole if desired (you can also topstitch along the back bodice edge, stopping at the shoulder seam, if you want to. i did that for the original dress but not this one). repeat for the other side.
flip the dress to the back, align top of the flap corners with the corners of the back bodice side pieces. if the flap overhangs the bottom, measure and trim it to fit (mine overhung by 1/4″). make sure flap is centered between the side seams, and baste into place along the bottom with 1/4″ seam.
hem the curved edge of the overskirt using a 1/4″ double folded hem. sew two rows of gathering stitches along the top (straight) edge, keeping both within a 1/2″ seam allowance.
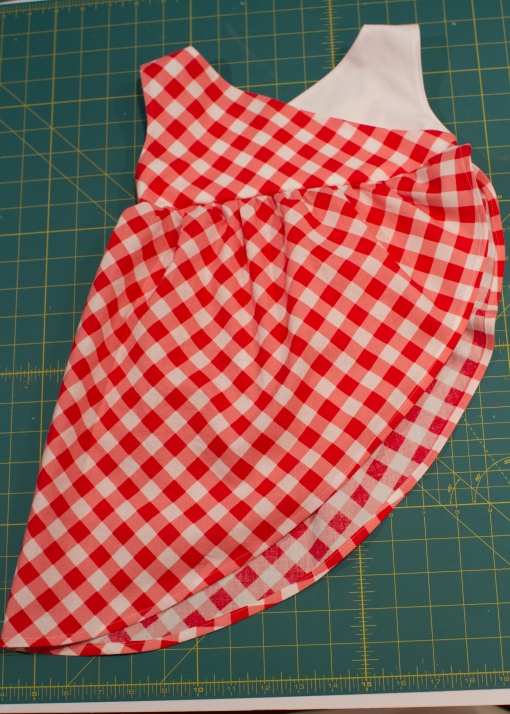
gather the overskirt to match the bodice width, then let a little of the gathering out to allow you to overlap the front of the overskirt over the back (the photo above is actually the opposite – sorry about that!) the part on the left (at the front of the dress) should be on the bottom. sew overskirt to the bodice with a 3/8″ seam.
now you have this! it looks pretty finished, but unless you want your preschooler to bare more leg than angelina jolie at the oscars, let’s attach the underskirt…
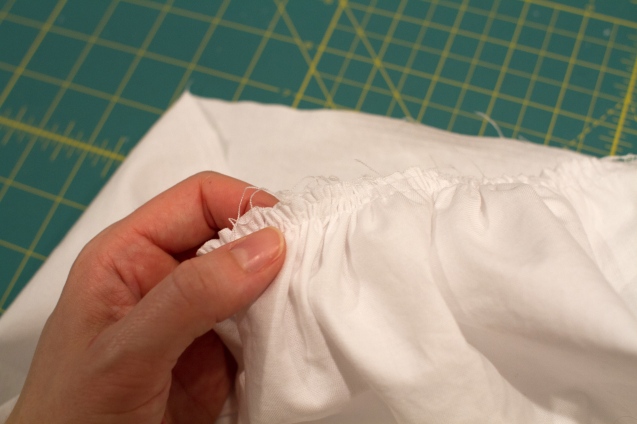
sew the short side of the underskirt with 1/2″ seam, forming a tube. finish the seam as desired. sew two rows of gathering stitches along the top, and gather.
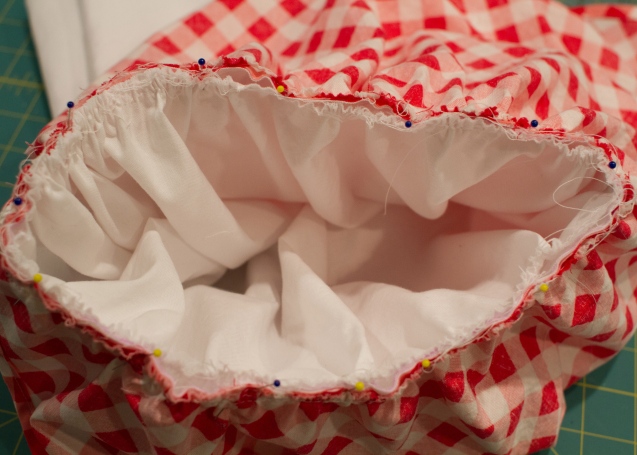
insert the skirt up through the bodice of the dress, so the bodice is sandwiched between the overskirt and underskirt and the wrong side of the underskirt is facing the right side of the overskirt. align the seam of the underskirt with the longest part of the overskirt, so it’ll be hidden when worn. distribute gathers evenly and pin. sew with 1/2″ seam allowance. if you have a serger, serge the raw edge where the bodice and skirts attach. if not, clip the seam to 1/4″ and zigzag the raw edge.
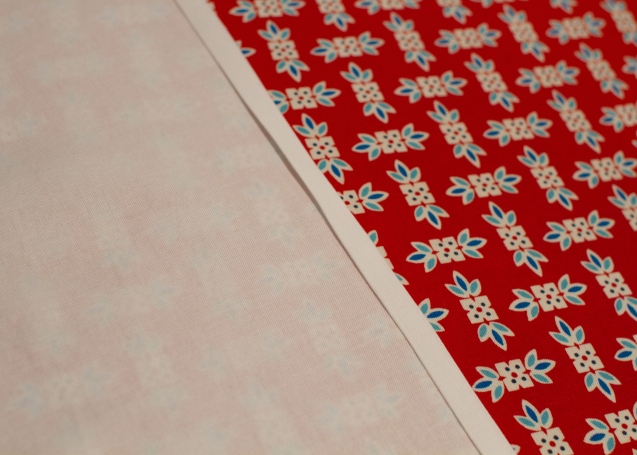
flip rightside out and press both skirts down away from the bodice (be sure to pull the underskirt down enough before pressing so that it hangs below the already-hemmed overskirt and gives you room to hem). the raw edges of the skirts are enclosed where they won’t touch skin, as shown here (dress is shown inside out). i figured that would be more comfortable for little gals to wear.
hem the underskirt to match the longest part of the overskirt (1/4″ double fold toward the wrong side, adjust if necessary).
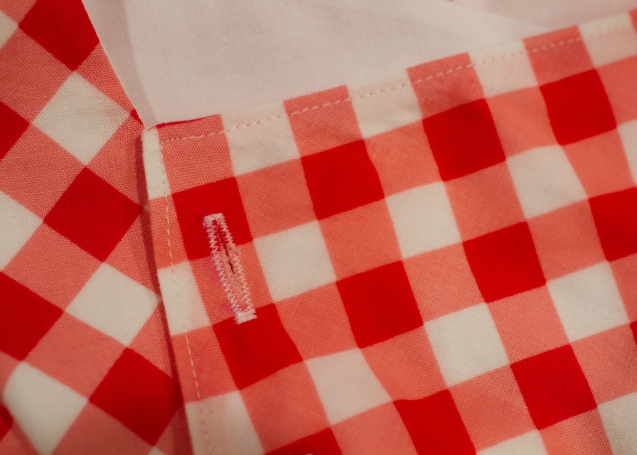
now add the four buttonholes, two on each side. if using plaid/gingham, work with the fabric to decide where to place your buttonholes, just making sure they’re even with each other, equidistant from the edges, and catching the back bodice underneath so you have somewhere to sew on your button! mark positions with water-soluble marker, then sew. sew on buttons.
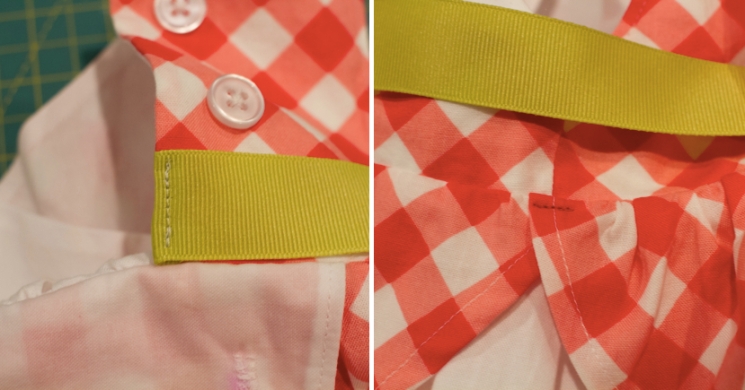
optional step, but a sash does help hide plaids that don’t quite match. 😉 double fold the ribbon with as small a hem as you can manage. pin it to the edge of the back bodice, so it will be hidden under the flap. wrap the ribbon around the front, trim, fold, and pin the other side so it matches the width of the bodice.
stitch the ribbon to the bodice. if you notice your overskirt not wanting to lie down, you may also stitch a bar tack on the overskirt using coordinating thread (becomes unnoticeable when worn). this also helps hide the raw-looking top edges of the skirts.
WOOHOO, YOU’RE DONE!
Em loves her pink “strawberry shortcake dress,” but her favorite part was the little felt strawberries i made to go with it, which she has been carrying around everywhere (ikat bag tutorial here, i just hot glued the tops on).

so there you have it! my most involved tutorial to date. PHEW! now i’m kind of glad i didn’t win that week of PR&P, because the tutorial took me way longer to make than the dress did! ha! anyway, i hope you enjoy it and please let me know if you make one. you’re also welcome to upload photos to the skirt as top flickr group and the “your craftiness definitely was not optional” flickr group!
let me know if you have any questions, and happy sewing!








Oh my gosh, I am so excited! I love this dress:) A huge Thank You for the tutorial:):):) I have been checking your blog like a crazed woman-thinking I missed the tutorial! I just love your blog, such an inspiration!
Haha, you’re welcome! Can’t wait to see your version! 🙂
Thanks for the tutorial. I need to get back to sewing spring clothes for my daughter, and this dress looks like a good project to make for her. On the practical side, it’s a good way to use a fabric that I don’t have enough of for an entire dress.
I think you might be able to get away with just 1 yard on the main fabric, too…I just didn’t want to have people get too little and struggle to cut it.
wowza, nice work kristin! i’m seriously impressed, you are so pro! those strawberries are super cute too, i might have to make some of those!
Thank you, ma’am! Oh yes, those strawberries would fit in perfectly with the rest of your miniature felt food items!
Really great and tons of work to make this available! Thank you so much!
Loved the Angelina comment before the underskirt.
😀
beautiful and wow, seriously impressed with the tutorial!!! Maybe I can muster some ambition and try it out (although my girls are going through a phase where they don’t wear anything I make). great job!!!
Thanks, Anna! Oh I would love to see your girls wearing one of these…hopefully they snap out of it. They’re crazy not to want to wear what you make! 🙂
hmm, wondering if the size 2/3 would fit S.
I believe it’s 21″ inches around the chest finished…she could try Em’s on the next time we see you if you want.
LOVE it! thanks for offering the pattern!
Nice Kristin!! I LOVE this. Thanks for taking the time to make the tutorial. It’s funny how much time it takes huh??
Omigosh so much time!!
Great! Can you let me know where you got the little wooden tool for turning corners? I love it.
I got it at a local fabric store, but I don’t think they’re uncommon. Search “bamboo point turner” on Amazon and you can see brands. I love that thing.
Do you think this would work reversed — with a plaid underneath and a sheer over the top?
Sure! Might want to line the sheer that would be crossing over the chest area with something more opaque since the part that crosses under wouldn’t provide full coverage, but otherwise, yeah! That’d look really great I bet – more of a special occasion dress.
I love this!! Both the original and the this new strawberry shortcake one…so cute!! Thanks for the tutorial! I’m thinking I am going to have to try this one!
Totally gorgeous!!!
This is really amazing, girl. Love it!
Thanks, Rae, and thanks for the pin!
so, so gorgeous! and I love the colors together-they’re SO strawberry shortcake-esque!
Thanks, and thank YOU once again for making such a lovely, adaptable pattern!! 🙂
Oooh! Thank you for doing all that! I can’t wait to make one for my daughter!
You are so kind and generous to share this tutorial with all of us! Thank you for taking the time to give us a peek into the making of a sweet tartan dress. So beautiful!!
Aw, you’re welcome! Thanks for your support! 🙂
wunderbar! I never actually thought I’d love to dress up my little Charlotte as much as I do. This sweet little dress is the perfect shape and pattern for a little girl…you’re generous to share your talents…thank you!
Oh thank you!
Beautiful!
Yay! Yay! Yay!
(now I just need to find time to sew this….sigh)
I love how you did the back side pieces on the bias and the flap on grain. It’s little touches like that that make you so fabulous.
Love this. Again!
Fabulous, haha! Thank you, madam! 🙂
Thank you so much for taking your precious time to post this. Since finding you via Project Run and Play, I have been patiently checking out your blog daily for this tutorial. I am a beginner sewer so not sure when I will get round to attempting this. But I surely will try soon….it is stunning, such a great dress.
Thanks
Why thank you, and sorry to keep you waiting! Haha! Sewing has such a steep learning curve, I’m sure you’ll be ready to tackle it in no time. 🙂
I’m with Kate… I found you through Project Run and Play. This dress was my favorite of the whole shebang. I’m so grateful to you for taking the tie to post this tutorial. I’m hoping to make one for my 6 yo’s Easter dress. I really love this style!
Oh thank you *blushes*! Please let me know if you make one!
HELLO!! I made a dress tonight, or I finished tonight, is not like yours is a purple jumper and my husband hate it!, because the color. Well, anyway I have not idea how make a dress, this is my first time and it is for my almost 12 moth niece. I took all the things and tips you put and your tutorial and made my dress. I’m so happy, and thank you so much.
ACK you did?!?! that’s so amazing, i’m so excited! i’m just glad it worked. 😀 you made my night, thank you, and please post it into the flickr group if you take a photo, i’d love to see it!
Ok, I’m in your flick group. Only have pictures the dress without model, because she is in Chile and me in Canada. Bye!!
I will probably be rummaging through fabric in about ten minutes so I can make this dress for my girl. This is so cute, Kristin!
🙂
I love this dress, need to run off to look at stash to see what I can use to start working on it tonight! Thank you for sharing this!
this one does remind me of strawberry shortcake… I was wondering this looks like it could be completely reversible?
Thanks so much for this great tutorial – I loved this dress when I first saw it on PR&P!
beautiful. but i don’t know how to do a gathering stitch. guess i better learn!
That’s so cute! I’m going to keep this tutorial.
I love the gingham on this version…darling Kristin!
I just wanted to say thanks so much for this tutorial!!! I fell in love with this dress the moment I saw it during Project Run and Play and I just made it for my daughter’s easter dress!! YAY!! I should have a blog post up about it this week and will add it to your Flickr group! HAve a great day!
Thank you for your tutorial. I made the most beautiful dress ever. I made it in a fuchsia polkadot. And i can’t wait until she can wear it. Sche must grow a little bit.
My 4 year old would love this! Any hints on how to adjust the size to a 4-5?
Hi,I fell in love with this dress the second I saw it.It is soooo beautiful.I made one for my GD .Thank you so much for the pattern and the tutorial.I posted the dress I made in a forum and everyone wanted the pattern.I have mentioned about your blog.Hope that is ok .Thanks again.
I just finished this dress. I printed the pattern at 90% and did 90% of the overskirt measurements and it fits my 12 month old daughter great. Love it!
I just picked up some red tartan at a thrift shop last week, and then I find your adorable pattern! I think I’m in love! Of course now it’s fall, but I could grade it up a size for next spring, of course whoever said you can’t wear white after labor day is nuts anyway. Thanks for all of your hard work. I will add it to your flickr group when I make it.
Thank you SO MUCH for making this tutorial!! I just found it via Pinterest when I was looking for a sweet dress to make for my two girls. It’s perfect! I have sewn quite a bit in the past, but this pattern stretched my skills just enough to make it very interesting. 🙂 One dress is done… looking fabulous! My 6yo is now pushing me to finish her dress quickly! 🙂 One question that has always bugged me: when sewing a gathering seam, why is it always recommended to have 2 or 3 seams? Why not just one?
Thank you for the pattern and tutorial, I have made a gorgeous dress from Kiwiana fabric, how can I post a photo please… Cheers Robin
I have tried for weeks to print out the instructions for this crossover dress. I printed out the pattern but it won’t let me do the instructions. Can you email them to me and maybe that would work? My email is nanagramms3@yahoo.com
hi there, i have printed the free pattern, but it only seems to have the top of pattern, bodice etc, how do i make the skirt part as i cant find the pattern to print? thanks so much this is a gorgeous dress!
the underskirt is a rectangle – you choose the length based on your child’s height – and the overskirt method is shown in the tutorial…sorry i don’t have pattern pieces for you!
I just finished this lovely dress for my 5 mos old. We’re having our family pics done and I wanted my heritage to be apart of it..so i used my clans tartan..it turned out awesome! Thank you for the tute..it wish I could add a pic of it here 🙂
sorry I’m old n new to on line patterns – I can’t understand where the buttons go and what the flap is for – do you still have a photo of the back finished – or maybe I will just follow your step by step instructions and see if I can work it out – beautiful dress – want to try to make it for my granddaughter – thanks for sharing
This is such a cute dress. I am featuring it on my site if you don’t mind.
I have tried for a few years to print this tutorial but have not been able to do so. Can’t understand why. Any other way to get the pattern and instructions? Thank you in advance for any help you can give me.